Random useful macOS things for Linux developers

A few random notes about things that can make life on macOS (the modern one, as in, circa 2023) better for those coming from Linux.

For various reasons you may end up with Mac hardware with macOS on the metal rather than Linux. This could be anything from battery life of the Apple Silicon machines (and not quite being ready to jump on the Asahi Linux bandwagon), to being able to run the corporate suite of Enterprise Software (arguably a bug more than a feature), to some other reason that is also fine.

My approach to most of my development is to have a remote more powerful Linux machine to do the heavy lifting, or do Linux development on Linux, and not bank on messing around with a bunch of software on macOS that would approximate something on Linux. This also means I can move my GUI environment (the Mac) easily forward without worrying about whatever weird workarounds I needed to do in order to get things going for whatever development work I’m doing, and vice-versa.

Terminal emulator? iTerm2. The built in Terminal.app is fine, but there’s more than a few nice things in iTerm2, including tmux integration which can end up making it feel a lot more like a regular Linux machine. I should probably go read the tmux integration best practices before I complain about some random bugs I think I’ve hit, so let’s pretend I did that and everything is perfect.

I tend to use the Mac for SSHing to bigger Linux machines for most of my work. At work, that’s mostly to a Graviton 2 EC2 Instance running Amazon Linux with all my development environments on it. At home, it’s mostly a Raptor Blackbird POWER9 system running Fedora.

Running Linux locally? For all the use cases of containers, Podman Desktop or finch. There’s a GUI part of Podman which is nice, and finch I know about because of the relatively nearby team that works on it, and its relationship to lima. Lima positions itself as WSL2-like but for Mac. There’s UTM for a full virtual machine / qemu environment, although I rarely end up using this and am more commonly using a container or just SSHing to a bigger Linux box.

There’s XCode for any macOS development that may be needed (e.g. when you want that extra feature in UTM or something) I do use Homebrew to install a few things locally.

Have a read of Andrew‘s blog post on OpenBMC Development on an Apple M1 MacBook Pro too.

The Apple Power Macintosh 7200/120 PC Compatible (Part 1)

So, I learned something recently: if you pick up your iPhone with eBay open on an auction bid screen in just the right way, you may accidentally click the bid button and end up buying an old computer. Totally not the worst thing ever, and certainly a creative way to make a decision.

So, not too long later, a box arrives!

In the 1990s, Apple created some pretty “interesting” computers and product line. One thing you could get is a DOS Compatibility (or PC Compatibility) card. This was a card that went into one of the expansion slots on a Mac and had something really curious on it: most of the guts of a PC.

Others have written on these cards too: https://www.engadget.com/2009-12-10-before-there-was-boot-camp-there-were-dos-compatibility-cards.html and http://www.edibleapple.com/2009/12/09/blast-from-the-past-a-look-back-at-apples-dos-compatibility-cards/. There’s also the Service Manual https://tim.id.au/laptops/apple/misc/pc_compatibility_card.pdf with some interesting details.

The machine I’d bought was an Apple Power Macintosh 7200/120 with the PC Compatible card added afterwards (so it doesn’t have the PC Compatible label on the front like some models ended up getting).

The Apple Power Macintosh 7200/120

Wikipedia has a good article on the line, noting that it was first released in August 1995, and fitting for the era, was sold as about 14 million other model numbers (okay not quite that bad, it was only a total of four model numbers for essentially the same machine). This specific model, the 7200/120 was introduced on April 22nd, 1996, and the original web page describing it from Apple is on the wayback machine.

For older Macs, Low End Mac is a good resource, and there’s a page on the 7200, and amazingly Apple still has the tech specs on their web site!

The 7200 series replaced the 7100, which was one of the original PowerPC based Macs. The big changes are using the industry standard PCI bus for its three expansion slots rather than NuBus. Rather surprisingly, NuBus was not Apple specific, but you could not call it widely adopted by successful manufacturers. Apple first used NuBus in the 1987 Macintosh II.

The PCI bus was standardized in 1992, and it’s almost certain that a successor to it is in the computer you’re using to read this. It really quite caught on as an industry standard.

The processor of the machine is a PowerPC 601. The PowerPC was an effort of IBM, Apple, and Motorola (the AIM Alliance) to create a class of processors for personal computers based on IBM’s POWER Architecture. The PowerPC 601 was the first of these processors, initially used by Apple in its Power Macintosh range. The machine I have has one running at a whopping 120Mhz. There continued to be PowerPC chips for a number of years, and IBM continued making POWER processors even after that. However, you are almost certainly not using a PowerPC derived processor in the computer you’re using to read this.

The PC Compatibility card has on it a full on legit Pentium 100 processor, and hardware for doing VGA graphics, a Sound Blaster 16 and the other things you’d usually expect of a PC from 1996. Since it’s on a PCI card though, it’s a bit different than a PC of the era. It doesn’t have any expansion slots of its own, and in fact uses up one of the three PCI slots in the Mac. It also doesn’t have its own floppy drive, or hard drive. There’s software on the Mac that will let the PC card use the Mac’s floppy drive, and part of the Mac’s hard drive for the PC!

The Pentium 100 was the first mass produced superscalar processor. You are quite likely to be using a computer with a processor related to the Pentium to read this, unless you’re using a phone or tablet, or one of the very latest Macs; in which case you’re using an ARM based processor. You likely have more ARM processors in your life than you have socks.

Basically, this computer is a bit of a hodge-podge of historical technology, some of which ended up being successful, and other things less so.

Let’s have a look inside!

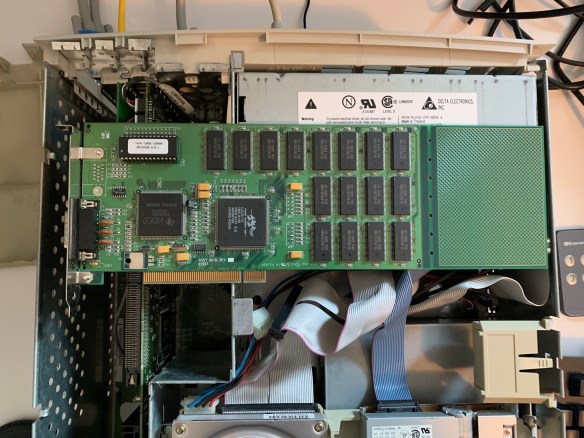
So, one of the PCI slots has a Vertex Twin Turbo 128M8A video card in it. There is not much about this card on the internet. There’s a photo of one on Wikimedia Commons though. I’ll have to investigate more.

Does it work though? Yes! Here it is on my desk:

The powered on Power Mac 7200/120

Even with Microsoft Internet Explorer 4.0 that came with MacOS 8.6, you can find some places on the internet you can fetch files from, at a not too bad speed even!

More fun times with this machine to come!

op-build v2.5 firmware for the Raptor Blackbird

Well, following on from my post where I excitedly pointed out that Raptor Blackbird support: all upstream in op-build v2.5, that means I can do another in my series of (close to) upstream Blackbird firmware builds.

This time, the only difference from straight upstream op-build v2.5 is my fixes for buildroot so that I can actually build it on Fedora 32.

So, head over to https://www.flamingspork.com/blackbird/op-build-v2.5-blackbird-images/ and grab blackbird.pnor to flash it on your blackbird, let me know how it goes!

Another close-to-upstream Blackbird Firmware Build

A few weeks ago (okay, close to six), I put up a firmware build for the Raptor Blackbird with close-to-upstream firmware (see here).

Well, I’ve done another build! It’s current op-build (as of this morning), but my branch with patches for the Raptor Blackbird. The skiboot patch is there, as is the SBE speedup patch. Current kernel (works fine with my hardware), current petitboot, and the machine-xml which is straight from Raptor but in my repo.

Versions of everything are:

$ lsprop /sys/firmware/devicetree/base/ibm,firmware-versions/
skiboot          "v6.5-209-g179d53df-p4360f95"
bmc-firmware-version
		 "0.01"
occ              "3ab2921"
hostboot         "779761d-pe7e80e1"
buildroot        "2019.05.3-14-g17f117295f"
capp-ucode       "p9-dd2-v4"
machine-xml      "site_local-stewart-a0efd66"
hostboot-binaries
		 "hw011120a.opmst"
sbe              "166b70c-p06fc80c"
hcode            "hw011520a.opmst"
petitboot        "v1.11"
phandle          000005d0 (1488)
version          "blackbird-v2.4-415-gb63b36ef"
linux            "5.4.13-openpower1-pa361bec"
name             "ibm,firmware-versions"

You can download all the bits (including debug tarball) from https://www.flamingspork.com/blackbird/stewart-blackbird-2-images/ and follow the instructions for trying it out or flashing blackbird.pnor.

Again, would love to hear how it goes for you!

Speeding up Blackbird boot: the SBE

The Self Boot Engine (SBE) is a small embedded PPE42 core inside the POWER9 CPU which has the unenvious job of getting a single POWER9 core ready enough to start executing instructions out of L3 cache, and poking some instructions into said cache for the core to start executing.

It’s called the “Self Boot Engine” as in generations prior to POWER8, it was the job of the FSP (Service Processor) to do all of the booting for the CPU. On POWER8, there was still an SBE, but it was a custom instruction set (this was the Power On Reset Engine – PORE), while the PPE42 is basically a 32bit powerpc core cut straight down the middle (just the way to make it awkward for toolchains).

One of the things I noted in my post on Booting temporary firmware on the Raptor Blackbird is that we got serial console output from the SBE. It turns out one of thing things explicitly not enabled by Raptor in their build was this output as “it made the SBE boot much slower”. I’d actually long suspected this, but hadn’t really had the time to delve into it.

Since for POWER9, the firmware for the SBE is now open source code, as is the ppe42-binutils and ppe42-gcc toolchain for it. This means we can hack on it!

WARNING: hacking on your SBE firmware can be relatively dangerous, as it’s literally the first thing that needs to work in order to boot the system, and there isn’t (AFAIK) publicly documented easy way to re-flash your SBE firmware if you mess it up.

Seeing as we saw a regression in boot time with the UART output enabled, we need to look at the uartPutChar() function in sbeConsole.C (error paths removed for clarity):

static void uartPutChar(char c)
{
    #define SBE_FUNC "uartPutChar"
    uint32_t rc = SBE_SEC_OPERATION_SUCCESSFUL;
    do {
        static const uint64_t DELAY_NS = 100;
        static const uint64_t DELAY_LOOPS = 100000000;

        uint64_t loops = 0;
        uint8_t data = 0;
        do {
            rc = readReg(LSR, data);
...
            if(data == LSR_BAD || (data & LSR_THRE))
            {
                break;
            }
            delay(DELAY_NS, 1000000);
        } while(++loops < DELAY_LOOPS);

...
        rc = writeReg(THR, c);
...
    } while(0);

    #undef SBE_FUNC
}

One thing you may notice if you’ve spent some time around serial ports is that it’s not using the transmit FIFO! While according to Wikipedia the original 16550 had a broken FIFO, but we’re certainly not going to be hooked up to an original rev of that silicon.

To compare, let’s look at the skiboot code, which is all in hw/lpc-uart.c:

static void uart_check_tx_room(void)
{
	if (uart_read(REG_LSR) & LSR_THRE) {
		/* FIFO is 16 entries */
		tx_room = 16;
		tx_full = false;
	}
}

The uart_check_tx_room() function is pretty simple, it checks if there’s room in the FIFO and knows that there’s 16 entries. Next, we have a busy loop that waits until there’s room again in the FIFO:

static void uart_wait_tx_room(void)
{
	while (!tx_room) {
		uart_check_tx_room();
		if (!tx_room) {
			smt_lowest();
			do {
				barrier();
				uart_check_tx_room();
			} while (!tx_room);
			smt_medium();
		}
	}
}

Finally, the bit of code that writes the (internal) log buffer out to a serial port:

/*
 * Internal console driver (output only)
 */
static size_t uart_con_write(const char *buf, size_t len)
{
	size_t written = 0;

	/* If LPC bus is bad, we just swallow data */
	if (!lpc_ok() && !mmio_uart_base)
		return written;

	lock(&uart_lock);
	while(written < len) {
		if (tx_room == 0) {
			uart_wait_tx_room();
			if (tx_room == 0)
				goto bail;
		} else {
			uart_write(REG_THR, buf[written++]);
			tx_room--;
		}
	}
 bail:
	unlock(&uart_lock);
	return written;
}

The skiboot code ends up being a bit more complicated thanks to a number of reasons, but the basic algorithm could be applied to the SBE code, and rather than busy waiting for each character to be written out before sending the other into the FIFO, we could just splat things down there and continue with life. So, I put together a patch to try out.

Before (i.e. upstream SBE code): it took about 15 seconds from “Welcome to SBE” to “Booting Hostboot”.

Now (with my patch): Around 10 seconds.

It’s a full five seconds (33%) faster to get through the SBE stage of booting. Wow.

Hopefully somebody looks at the pull request sometime soon, as it’s probably useful to a lot of people doing firmware and Operating System development.

So, Happy New Year for Blackbird owners (I’ll publish a build with this and other misc improvements “soon”).

Are you Fans of the Blackbird? Speak up, I can’t hear you over the fan.

So, as of yesterday, I started running a pretty-close-to-upstream op-build host firmware stack on my Blackbird. Notable yak-shaving has included:

Apart from that, I was all happy as Larry. Except then I went into the room with the Blackbird in it an went “huh, that’s loud”, and since it was bedtime, I decided it could all wait until the morning.

It is now the morning. Checking fan speeds over IPMI, one fan stood out (fan2, sitting at 4300RPM). This was a bit of a surprise as what’s silkscreened on the board is that the rear case fan is hooked up to ‘fan2″, and if we had a “start from 0/1” mix up, it’d be the front case fan. I had just assumed it’d be maybe OCC firmware dying or something, but this wasn’t the case (I checked – thanks occtoolp9!)

After a bit of digging around, I worked out this mapping:

IPMI fan0Rear Case FanMotherboard Fan 2
IPMI fan1Front Case FanMotherboard Fan 3
IPMI fan2CPU FanMotherboard Fan 1

Which is about as surprising and confusing as you’d think.

After a bunch of digging around the Raptor ports of OpenBMC and Hostboot, it seems that the IPL Observer which is custom to Raptor controls if the BMC decides to do fan control or not.

You can get its view of the world from the BMC via the (incredibly user friendly) poking at DBus:

busctl get-property org.openbmc.status.IPL /org/openbmc/status/IPL org.openbmc.status.IPL current_status; busctl get-property org.openbmc.status.IPL /org/openbmc/status/IPL org.openbmc.status.IPL current_istep

Which if you just have the Hostboot patch in (like I first did) you end up with:

s "IPL_RUNNING"
s "21,3"

Which is where Hostboot exits the IPL process (as you see on the screen) and hands over to skiboot. But if you start digging through their op-build tree, you find that there’s a signal_linux_start_complete script which calls pnv-lpc to write two values to LPC ports 0x81 and 0x82. The pnv-lpc utility is the external/lpc/ binary from skiboot, and these two ports are the “extended lpc port 80h” state.

So, to get back fan control? First, build the lpc utility:

git clone git@github.com:open-power/skiboot.git
cd skiboot/external/lpc
make

and then poke the magic values of “IPL complete and linux running”:

$ sudo ./lpc io 0x81.b=254
[io] W 0x00000081.b=0xfe
$ sudo ./lpc io 0x82.b=254
[io] W 0x00000082.b=0xfe

You get a friendly beep, and then your fans return to sanity.

Of course, for that to work you need to have debugfs mounted, as this pokes OPAL debugfs to do direct LPC operations.

Next up: think of a smarter way to trigger that than “stewart runs it on the command line”. Also next up: work out the better way to determine that fan control should be on and patch the BMC.

Upstreaming Blackbird firmware (step 1: skiboot)

Now that I can actually boot the machine, I could test and send my patch upstream for Blackbird support in skiboot. One thing I noticed with the current firmware from Raptor is that the PCIe slot names were wrong. While a pretty minor point, it’s a bit funny that there’s only two slots and the names were wrong.

The PCIe slot names are used to call out the physical location of PCIe cards in the system, so if you, say, hit a bunch of errors, OS/firmware can say “It’s this card in the slot labeled BLAH on the board”.

With my patch, the slot table from skiboot is spat out looking like this:

[   64.296743001,5] PHB#0000:00:00.0 [ROOT] 1014 04c1 R:00 C:060400 B:01..ff SLOT=SLOT1 PCIE 4.0 X16 
 [   64.296875483,5] PHB#0001:00:00.0 [ROOT] 1014 04c1 R:00 C:060400 B:01..01 SLOT=SLOT2 PCIE 4.0 X8 
 [   64.297054197,5] PHB#0001:01:00.0 [EP  ] 8086 f1a8 R:03 C:010802 (  mass-storage) LOC_CODE=SLOT2 PCIE 4.0 X8
 [   64.297285067,5] PHB#0002:00:00.0 [ROOT] 1014 04c1 R:00 C:060400 B:01..01 SLOT=Builtin SATA 
 [   64.297411565,5] PHB#0002:01:00.0 [LGCY] 1b4b 9235 R:11 C:010601 (          sata) LOC_CODE=Builtin SATA
 [   64.297554540,5] PHB#0003:00:00.0 [ROOT] 1014 04c1 R:00 C:060400 B:01..01 SLOT=Builtin USB 
 [   64.297732049,5] PHB#0003:01:00.0 [EP  ] 104c 8241 R:02 C:0c0330 (      usb-xhci) LOC_CODE=Builtin USB
 [   64.297848624,5] PHB#0004:00:00.0 [ROOT] 1014 04c1 R:00 C:060400 B:01..01 SLOT=Builtin Ethernet 
 [   64.298026870,5] PHB#0004:01:00.0 [EP  ] 14e4 1657 R:01 C:020000 (      ethernet) LOC_CODE=Builtin Ethernet
 [   64.298212291,5] PHB#0004:01:00.1 [EP  ] 14e4 1657 R:01 C:020000 (      ethernet) LOC_CODE=Builtin Ethernet
 [   64.298424962,5] PHB#0004:01:00.2 [EP  ] 14e4 1657 R:01 C:020000 (      ethernet) LOC_CODE=Builtin Ethernet
 [   64.298587848,5] PHB#0005:00:00.0 [ROOT] 1014 04c1 R:00 C:060400 B:01..02 SLOT=BMC 
 [   64.298722540,5] PHB#0005:01:00.0 [ETOX] 1a03 1150 R:04 C:060400 B:02..02 LOC_CODE=BMC
 [   64.298850009,5] PHB#0005:02:00.0 [PCID] 1a03 2000 R:41 C:030000 (           vga) LOC_CODE=BMC

If you want to give it a go, grab the patch, build skiboot, and flash it on. Alternatively, you can download a built skiboot here. To flash it, do this:

# Copy to your BMC for the Blackbird
scp skiboot-v6.5-146-g376bed3f.lid.xz.stb root@blackbird:/tmp/

# then, ssh to the BMC
$ ssh root@blackbird

# ensure the machine is off
obmcutil poweroff --wait

# Now, make a backup copy (remember to copy it off /tmp on the bmc)
pflash -P PAYLOAD -r /tmp/skiboot-backup

# and flash the new skiboot:
pflash -e -P PAYLOAD -p /tmp/skiboot.lid.xz.stb

# now, power on the box
obmcutil poweron

Blackbird (singing in the dead of night..)

Way back when Raptor Computer Systems was doing pre-orders for the microATX Blackboard POWER9 system, I put in a pre-order. Since then, I’ve had a few life changes (such as moving to the US and starting to work for Amazon rather than IBM), but I’ve finally gone and done (most of) the setup for my own POWER9 system on (or under) my desk.

An 8 core POWER9 CPU, in bubble wrap and plastic packaging.

Everything came in a big brown box, all rather well packed. I had the board, CPU, heatsink assembly and the special tool to attach the heatsink to the board. Although unique to POWER9, the heatsink/fan assembly was one of the easier ones I’ve ever attached to a board.

The board itself looks pretty much as you’d expect – there’s a big spot for the CPU, a couple of PCI slots, a couple of DIMM slots and some SATA connectors.

The bits that are a bit unusual for a micro-ATX board are the big space reserved for FlexVer, the ASPEED BMC chip and the socketed flash. FlexVer is something I’m not ever going to use, and instead wish that there was an on-board m2 SSD slot instead, even if it was just PCIe. Having to sacrifice a PCIe slot just for a SSD is kind of a bummer.

The Blackbird POWER9 board
The POWER9 chip in socket

One annoying thing is my DIMMs are taking their sweet time in getting here, so I couldn’t actually populate the board with any memory.

Even without memory though, you can start powering it on and see that everything else works okay (i.e. it’s not completely boned). So, even without DIMMs, I could plug it in, and observe the Hostboot firmware complaining about insufficient hardware to IPL the box.

It Lives!

Yep, out the console (via ssh) you clearly see where things fail:

--== Welcome to Hostboot hostboot-3beba24/hbicore.bin ==--

  3.03104|secure|SecureROM valid - enabling functionality
  6.67619|Booting from SBE side 0 on master proc=00050000
  6.85100|ISTEP  6. 5 - host_init_fsi
  7.23753|ISTEP  6. 6 - host_set_ipl_parms
  7.71759|ISTEP  6. 7 - host_discover_targets
 11.34738|HWAS|PRESENT> Proc[05]=8000000000000000
 11.34739|HWAS|PRESENT> Core[07]=1511540000000000
 11.69077|ISTEP  6. 8 - host_update_master_tpm
 11.73787|SECURE|Security Access Bit> 0x0000000000000000
 11.73787|SECURE|Secure Mode Disable (via Jumper)> 0x8000000000000000
 11.76276|ISTEP  6. 9 - host_gard
 11.96654|HWAS|FUNCTIONAL> Proc[05]=8000000000000000
 11.96655|HWAS|FUNCTIONAL> Core[07]=1511540000000000
 12.07554|================================================
 12.07554|Error reported by hwas (0x0C00) PLID 0x90000007
 12.10289|  checkMinimumHardware found no functional dimm cards.
 12.10290|  ModuleId   0x03 MOD_CHECK_MIN_HW
 12.10291|  ReasonCode 0x0c06 RC_SYSAVAIL_NO_MEMORY_FUNC
 12.10292|  UserData1  HUID of node : 0x0002000000000000
 12.10293|  UserData2  number of present, non-functional dimms : 0x0000000000000000
 12.10294|------------------------------------------------
 12.10417|  Callout type             : Procedure Callout
 12.10417|  Procedure                : EPUB_PRC_FIND_DECONFIGURED_PART
 12.10418|  Priority                 : SRCI_PRIORITY_HIGH
 12.10419|------------------------------------------------
 12.10420|  Hostboot Build ID: hostboot-3beba24/hbicore.bin
 12.10421|================================================
 12.51718|================================================
 12.51719|Error reported by hwas (0x0C00) PLID 0x90000007
 12.51720|  Insufficient hardware to continue.
 12.51721|  ModuleId   0x03 MOD_CHECK_MIN_HW
 12.51722|  ReasonCode 0x0c04 RC_SYSAVAIL_INSUFFICIENT_HW
 12.54457|  UserData1   : 0x0000000000000000
 12.54458|  UserData2   : 0x0000000000000000
 12.54458|------------------------------------------------
 12.54459|  Callout type             : Procedure Callout
 12.54460|  Procedure                : EPUB_PRC_FIND_DECONFIGURED_PART
 12.54461|  Priority                 : SRCI_PRIORITY_HIGH
 12.54462|------------------------------------------------
 12.54462|  Hostboot Build ID: hostboot-3beba24/hbicore.bin
 12.54463|================================================
 12.73660|System shutting down with error status 0x90000007
 12.75545|================================================
 12.75546|Error reported by istep (0x1700) PLID 0x90000007
 12.77991|  IStep failed, see other log(s) with the same PLID for reason.
 12.77992|  ModuleId   0x01 MOD_REPORTING_ERROR
 12.77993|  ReasonCode 0x1703 RC_FAILURE
 12.77994|  UserData1  eid of first error : 0x9000000800000c04
 12.77995|  UserData2  Reason code of first error : 0x0000000100000609
 12.77996|------------------------------------------------
 12.77996|  host_gard
 12.77997|------------------------------------------------
 12.77998|  Callout type             : Procedure Callout
 12.77998|  Procedure                : EPUB_PRC_HB_CODE
 12.77999|  Priority                 : SRCI_PRIORITY_LOW
 12.78000|------------------------------------------------
 12.78001|  Hostboot Build ID: hostboot-3beba24/hbicore.bin
 12.78002|================================================

Looking forward to getting some DIMMs to show/share more.

Looking at the state of Blackbird firmware

Having been somewhat involved in OpenPOWER firmware, I have a bunch of experience and opinions on maintaining firmware trees for products, what working with upstream looks like and all that.

So, with my new Blackbird system I decided to take a bit of a look as to what the firmware situation was like.

There’s two main parts of firmware: BMC and Host. The BMC firmware runs purely on the ASPEED AST2500 and is based on OpenBMC while the host firmware is what runs on the POWER9 and is based off of OpenPOWER Firmware as assembled by op-build.

Initial impressions on the BMC is that there doesn’t seem to be any web based UI for it, which is kind of disappointing, as the Web UI being developed upstream has some nice qualities, and I’d say I even enjoyed using it when it was built into BMC firmware for systems we had when I was at IBM.

Looking at the git trees, the raptor-v1.00 tag is OpenBMC 2.7.0-dev-533-g386e5602e while current master is 2.8.0-dev-960-g10f7830bd. The spot where it split off was 2.7.0-dev-430-g7443ee80b, from April 2019 – so it’s not too old, but I’m also not convinced there should have been some security patches since then.

I’m not sure if any of the OpenBMC code is upstream, I haven’t looked.

Unfortunately, none of the host firmware is upstream.

On the host firmware side, v2.3-rc2-67-ga6a5f142 is the Raptor tag, and that compares with current master of v2.4-305-g54d8daf4, the place where Raptor forked was v2.3-rc2-9-g7b556015, again in April of 2019. Considering there was an upstream release in May of 2019 (v2.3), and again in July (v2.4), it could have easily have made it into an upstream release.

Unfortunately, there doesn’t seem to have been an upstream op-build release since v2.4 back in July (when I made it shortly before leaving IBM).

The skiboot component of host firmware has had an upstream release since I left (v6.5 in mid-August 2019), so the (rather trivial) platform support could have easily made it. I have a cleaned up and ready to upstream patch for it, I just need some DIMMs to actually test with before I send the patch.

As the current firmware situation stands, producing another build with updated upstream code is tricky due to the out-of-tree nature of the Blackbird patches, and a straight “git merge” is probably doable by some people, but not everybody.

On my TODO list is to get all the code into a state I can upstream it, assess vulnerability to CVE-2019-6260, and work out how I want to make it do Secure Boot (something that isn’t in upstream firmware yet, and currently would require a TPM, which I do not have).

Tracing flash reads (and writes) during boot

On OpenPOWER POWER9 systems, we typically talk to the flash chips that hold firmware for the host (i.e. the POWER9) processor through a daemon running on the BMC (aka service processor) rather than directly.

We have host firmware map “windows” on the LPC bus to parts of the flash chip. This flash chip can in fact be a virtual one, constructed dynamically from files on the BMC.

Since we’re mapping windows into this flash address space, we have some knowledge as to what IO the host is doing to/from the pnor. We can use this to output data in the blktrace format and feed into existing tools used to analyze IO patterns.

So, with a bit of learning of the data format and learning how to drive the various tools, I was ready to patch the BMC daemon (mboxbridge) to get some data out.

An initial bit of data is a graph of the windows into PNOR opened up during an normal boot (see below).

PNOR windows created over the course of a normal boot.

This shows us that over the course of the boot, we open a bunch of windows, and switch them around a fair bit early on. This makes sense as early in boot we do not yet have DRAM working and page in firmware on-demand into L3 cache.

Later in boot, you can see the loading of larger chunks of firmware into memory. It’s also possible to see that this seems to take longer than it should – and indeed, we have a bug there.

Next, by modifying the code again, I introduced recording of when we used a window that the BMC had already cached. While the host will only see one window at a time, the BMC can keep around the ones it prepared earlier in order to avoid IO to the actual flash chips (which are SPI flash, so aren’t incredibly fast).

Here we can see that we’re likely not doing the most efficient things during boot, and there’s probably room for some optimization.

Normal boot but including re-used Windows rather than just created ones

Finally, in order to get finer grained information, I reduced the window size from one megabyte down to 4096 bytes. This will impose a heavy speed penalty as it’ll mean we will have to create a lot more windows to do the same amount of IO, but it means that since we’re using the page size of hostboot, we’ll see each individual page in/out operation that it does during boot.

So, from the next graph, we can see that there’s several “hot” areas of the image, and on the whole it’s not too many pages. This gives us a hint that a bit of effort to reduce binary image size a little bit could greatly reduce the amount of IO we have to do.

4096 byte (i.e. page) size window, capturing the bits of flash we need to read in several times due to being low on memory when we’re L3 cache constrained.

The iowatcher tool also can construct a video of the boot and what “blocks” are being read.

Video of what blocks are read from flash during booting

So, what do we get from this adventure? Well, we get a good list of things to look into in order to improve boot performance, and we get to back these up with data rather than guesswork. Since this also works on unmodified host firmware, we’re measuring what we really boot rather than changing it in order to measure it.

What you need to reproduce this:

op-test-framework: Let’s break the console!

One of the things I’ve been working on fairly quietly is the test suite for OpenPOWER firmware: op-test-framework. I’ve approach things I’m hacking on from the goal of “when I merge patches into skiboot, can I be confident that I haven’t merged something that’s broken existing functionality?”

By testing host firmware, we incidentally (as well as on purpose) test a whole bunch of BMC functionality. One bit of functionality we rely on a lot is the host “serial” console. Typically, this is exposed to the user over IPMI Serial Over LAN (SOL), or on OpenBMC it’s also exposed as something you can ssh to (which proves to be both faster and more reliable than IPMI, not to mention there’s some remote semblance of security).

When running through some tests, I noticed something pretty odd, it appeared as though we were sometimes missing some console output on larger IOs. This usually isn’t a problem as when we’re using expect(1) (or the python equivalent pexpect) we end up having all sorts of delays here there and everywhere to work around all the terrible things you hope you never learn. So… how could I test that? Well.. what about checking the output of something like dd if=/dev/zero bs=1024 count=16|hexdump -C to see if we get the full output?

Time to add a test to op-test-framework! Adding such a test is pretty easy. If we look at the source of the test I added, we can see what happens (source here).

class Console():
    bs = 1024
    count = 8
    def setUp(self):
        conf = OpTestConfiguration.conf
        self.bmc = conf.bmc()
        self.system = conf.system()

    def runTest(self):
        self.system.goto_state(OpSystemState.PETITBOOT_SHELL)
        console = self.bmc.get_host_console()
        self.system.host_console_unique_prompt()
        bs = self.bs
        count = self.count
        self.assertTrue( (bs*count)%16 == 0, "Bug in test writer. Must be multiple of 16 bytes: bs %u count %u / 16 = %u" % (bs, count, (bs*count)%16))
        try:
            zeros = console.run_command("dd if=/dev/zero bs=%u count=%u|hexdump -C -v" % (bs, count), timeout=120)
        except CommandFailed as cf:
            self.assertEqual(cf.exitcode, 0)
        self.assertTrue( len(zeros) == 3+(count*bs)/16, "Unexpected length of zeros %u" % (len(zeros)))

First thing you’ll notice is that this looks like a Python unittest. It’s because it is. The unittest infrastructure was a path of least resistance, so we started with it. This class isn’t the one that’s actually run, we do a little bit of inheritance magic in order to run the same test with different parameters (see https://github.com/open-power/op-test-framework/blob/6c74fb0fb0993ae8ae1a7aa62ec58e57c0080686/testcases/Console.py#L50)

class Console8k(Console, unittest.TestCase):
    bs = 1024
    count = 8

class Console16k(Console, unittest.TestCase):
    bs = 1024
    count = 16

class Console32k(Console, unittest.TestCase):
    bs = 1024
    count = 32

The setUp() function is pure boiler plate, we grab some objects from the configuration of the test run, namely information about the BMC and the system itself, so we can do things to both. The real magic happens in runTest().

op-test-framework tracks the state of the machine being tested across each test. This means that if we’re executing 101 tests in the petitboot shell, we don’t need to do 101 separate boots to petitboot. The self.system.goto_state(OpSystemState.PETITBOOT_SHELL) statement says “Please ensure the system is booted to the petitboot shell”. Other states include OFF (obvious) and OS, which is when the machine is booted to the OS.

The next two lines ensure we can run commands on the console (where console is IPMI Serial over LAN or other similar connection, such as the SSH console provided by OpenBMC):

console = self.bmc.get_host_console()
self.system.host_console_unique_prompt()

The host_console_unique_prompt() call is a bit ugly, and I’m hoping we fix the APIs so that this isn’t needed. Basically, it sets things up so that pexpect will work properly.

The bit that does the work is the try/except block along with the assertTrue. We don’t currently check that the content is all correct, we just check we got the right *amount* of content.

It turns out, this check is enough to reveal a bug that turns out to be deep in the core Linux TTY layer, and has caused Jeremy some amount of fun (for certain values of fun).

Want to know more about how the console works? Jeremy blogged on it.

Fast Reset, Trusted Boot and the security of /sbin/reboot

In OpenPOWER land, we’ve been doing some work on Secure and Trusted Boot while at the same time doing some work on what we call fast-reset (or fast-reboot, depending on exactly what mood someone was in at any particular time…. we should start being a bit more consistent).

The basic idea for fast-reset is that when the OS calls OPAL reboot, we gather all the threads in the system using a combination of patching the reset vector and soft-resetting them, then cleanup a few bits of hardware (we do re-probe PCIe for example), and reload & restart the bootloader (petitboot).

What this means is that typing “reboot” on the command line goes from a ~90-120+ second affair (through firmware to petitboot, linux distros still take ages to shut themselves down) down to about a 20 second affair (to petitboot).

If you’re running a (very) recent skiboot, you can enable it with a special hidden NVRAM configuration option (although we’ll likely enable it by default pretty soon, it’s proving remarkably solid). If you want to know what that NVRAM option is… Use the source, Luke! (or git history, but I’ve yet to see a neat Star Wars reference referring to git commit logs).

So, there’s nothing like a demo. Here’s a demo with Ubuntu running off an NVMe drive on an IBM S822LC for HPC (otherwise known as Minsky or Garrison) which was running the HTX hardware exerciser, through fast-reboot back into Petitboot and then booting into Ubuntu and auto-starting the exerciser (HTX) again.

Apart from being stupidly quick when compared to a full IPL (Initial Program Load – i.e. boot), since we’re not rebooting out of band, we have no way to reset the TPM, so if you’re measuring boot, each subsequent fast-reset will result in a different set of measurements.

This may be slightly confusing, but it’s not really a problem. You see, if a machine is compromised, there’s nothing stopping me replacing /sbin/reboot with something that just prints things to the console that look like your machine rebooted but in fact left my rootkit running. Indeed, fast-reset and a full IPL should measure different values in the TPM.

It also means that if you ever want to re-establish trust in your OS, never do a reboot from the host – always reboot out of band (e.g. from a BMC). This, of course, means you’re trusting your BMC to not be compromised, which I wouldn’t necessarily do if you suspect your host has been.

Windows NT4 for PowerPC guest on OPAL on POWER8 in qemu

Sometimes, programming is just for fun. This is what PREPHV is for Andrei Warkentin. To quote the README:

“This is mostly a huge ugly hack, derived from my
ppc64le_hello code. The running philosophy here is
to throw things together late at night with my family
asleep and see how far I get without a real design
or without a real desire to implement boring things
like IDE (*sigh*) emulation”

Since my day job is maintaining the firmware that it runs on, I decided to have a go (it also ties in with the retro stuff I’ve been blogging about). So…

screenshot-from-2016-10-30-17-22-20and I’m off! (yes, this is the very latest qemu and skiboot):

screenshot-from-2016-10-30-17-23-32screenshot-from-2016-10-30-17-23-48Yes, prephv does clear all thirty two megabytes of guest memory

screenshot-from-2016-10-30-17-24-15A quick diversion, if you try Windows NT 3.51 for PowerPC, you get this:

screenshot-from-2016-10-30-18-17-35

But on NT4, you continue unharmed:

screenshot-from-2016-10-30-17-22-32A sign I needed to hack my filesystem of bits of NT installer bits a bit more:

screenshot-from-2016-10-30-17-22-45But, on my next try:

screenshot-from-2016-10-30-17-25-26Well… looks like there’s an instruction that needs to be emulated (and there’s no code to currently do that). Mind you… this is decently far into booting before we hit anything fatal, which is a pretty impressive effort – and it is tempting to continue and see if it’ll run on real hardware and if it could be made to work well enough to not find any disks :)

Workaround for opal-prd using 100% CPU

opal-prd is the Processor RunTime Diagnostics daemon, the userspace process that on OpenPower systems is responsible for some of the runtime diagnostics. Although a userspace process, it memory maps (as in mmap) in some code loaded by early firmware (Hostboot) called the HostBoot RunTime (HBRT) and runs it, using calls to the kernel to accomplish any needed operations (e.g. reading/writing registers inside the chip). Running this in user space gives us benefits such as being able to attach gdb, recover from segfaults etc.

The reason this code is shipped as part of firmware rather than as an OS package is that it is very system specific, and it would be a giant pain to update a package in every Linux distribution every time a new chip or machine was introduced.

Anyway, there’s a bug in the HBRT code that means if there’s an ECC error in the HBEL (HostBoot Error Log) partition in the system flash (“bios” or “pnor”… the flash where your system firmware lives), the opal-prd process may get stuck chewing up 100% CPU and not doing anything useful. There’s https://github.com/open-power/hostboot/issues/67 for this.

You will notice a problem if the opal-prd process is using 100% CPU and the last log messages are something like:

HBRT: ERRL:>>ErrlManager::ErrlManager constructor.
HBRT: ERRL:iv_hiddenErrorLogsEnable = 0x0
HBRT: ERRL:>>setupPnorInfo
HBRT: PNOR:>>RtPnor::getSectionInfo
HBRT: PNOR:>>RtPnor::readFromDevice: i_offset=0x0, i_procId=0 sec=11 size=0x20000 ecc=1
HBRT: PNOR:RtPnor::readFromDevice: removing ECC...
HBRT: PNOR:RtPnor::readFromDevice> Uncorrectable ECC error : chip=0,offset=0x0

(the parameters to readFromDevice may differ)

Luckily, there’s a simple workaround to fix it all up! You will need the pflash utility. Primarily, pflash is meant only for developers and those who know what they’re doing. You can turn your computer into a brick using it.

pflash is packaged in Ubuntu 16.10 and RHEL 7.3, but you can otherwise build it from source easily enough:

git clone https://github.com/open-power/skiboot.git
cd skiboot/external/pflash
make

Now that you have pflash, you just need to erase the HBEL partition and write (ECC) zeros:

dd if=/dev/zero of=/tmp/hbel bs=1 count=147456
pflash -P HBEL -e
pflash -P HBEL -p /tmp/hbel

Note: you cannot just erase the partition or use the pflash option to do an ECC erase, you may render your system unbootable if you get it wrong.

After that, restart opal-prd however your distro handles restarting daemons (e.g. systemctl restart opal-prd.service) and all should be well.

Compiling your own firmware for Barreleye (OpenCompute OpenPOWER system)

Aaron Sullivan announced on the Rackspace Blog that you can now get your own Barreleye system! What’s great is that the code for the Barreleye platform is upstream in the op-build project, which means you can build your own firmware for them (just like garrison, the “IBM S822LC for HPC” system I blogged about a few days ago).

Remarkably, to build an image for the host firmware, it’s eerily similar to any other platform:

git clone --recursive https://github.com/open-power/op-build.git
cd op-build
. op-build-env
op-build barreleye_defconfig
op-build

…and then you wait. You can cross compile on x86.

You’ve been able to build firmware for these machines with upstream code since Feb/March (I wouldn’t recommend running with builds from then though, try the latest release instead).

Hopefully, someone involved in OpenBMC can write on how to build the BMC firmware.

Using Smatch static analysis on OpenPOWER OPAL firmware

For Skiboot, I’m always looking at new automated systems to find bugs in the code. A little while ago, I read about the Smatch tool developed by some folks at Oracle (they also wrote about using it on the Linux kernel).

I was eager to try it with skiboot to see if it could find anything.

Luckily, it was pretty easy. I built Smatch according to their documentation and then built skiboot:

make CHECK="/home/stewart/smatch/smatch" C=1 -j20 all check

Due to some differences in how we implement abort() and assert() in skiboot, I added “_abort”, “abort” and “assert_fail” to smatch_data/no_return_funcs in the Smatch source tree to silence some false positives.

It seems that there’s a few useful warnings there (some of which I’ve fixed in skiboot master already), along with some false positives around the preprocessor/complier tricks we do to ensure at compile time that an OPAL call definition has the correct number of arguments specified.

So far, so good though. Try it on your project!

Building OPAL firmware for POWER9

Recently, we merged into the op-build project (the build scripts for OpenPOWER Firmware) a defconfig for building OPAL for (certain) POWER9 simulators. I won’t bother linking over to articles on the POWER9 chip or schedule (there’s search engines for that), but with this commit – if you happen to be able to get your hands on a POWER9 simulator, you can now boot to the petitboot bootloader on it!

We’re using upstream Linux 4.7.0-rc3 and upstream skiboot (master), so all of this code is already upstream!

Now, by no means is this complete. There’s some fairly fundamental things that are missing (e.g. PCI) – but how many other platforms can you build open source firmware for before you can even get your hands on a simulator?

First POWER9 bits merged into skiboot master

I just merged in some base POWER9 support patches into skiboot. While this is in no way near complete or really enough to be interesting to anyone that isn’t heavily involved in POWER9 development, it’s nice to take upstream first and open source first so seriously that this level of base enablement patches is easy to merge in.

Other work that has gone on for POWER9 in open source projects include way back in November 2015 where work for the updated PowerISA 3.0 was merged into binutils and this year there’s been kernel work too.

Video of my Percona Live Talk: Why would I run MySQL/MariaDB on POWER anyway?

Good news everyone! There’s video up for the talk I gave at Percona Live in April 2016 up: Why would I run MySQL/MariaDB on POWER anyway?

The talk is a general overview of POWER and why MySQL/MariaDB may be a good fit.